This post has its roots in 2011. Back then I was a "senior" front end developer who, for a series of circumstances pretty much driven by pure luck, was attending to the first Italian Domain Driven Design day, in Bologna. I would love to say that said day struck me and lead my career in the direction it took, but the truth is it didn't: it was one of the many events I've been attending even though it wasn't in my area of competence, following the not always explicit intention of fostering my T shaped formation.
Jump forward to last week, I caught myself saying something on the lines of "I'm not an expert of DDD, but from what I can remember..." followed by what probably was a silly thing, but that's only to say that in my day to day event driven architectures, micro services and domain boundaries are more relevant than ever.
But I'm digressing: this post is specifically about Serverless.
Serveless
I've been working with Serverless for a little while now, without fully embracing the potential and the complexity. In 2016 I had to start a project from scratch in order to properly learn React, and now it was time to do the same with Serverless.
My partner, during these quarantine days, is working on remote online workshops with her charity and one of the pain point was the difficulty to find a platform allowing for uploading imagery and create visual stories without having to go through the hoops of registering with 3rd party services and such.
The request was to have the ability to start a thread of images and get other people to reply with images themselves.
First thing first: I wanted to work with a static site – on Netlify ça va sans dire – and Firebase, mostly because I didn't want to have to deal myself with the real time updates.
I found a tutorial and started from there, with the Serverless config file and a basic Lambda.
# file: serverless.yml

# service name
service: imageupload

provider:
  name: aws
  # this one I updated to nodejs12.x
  runtime: nodejs4.3
  iamRoleStatements:
    - Effect: "Allow"
      Action:
        - "s3:*"
      Resource: "arn:aws:s3:::slsupload/*"

# this is the Lambda definition, where the handler method `requestUploadURL`
# gets exposed via an http POST method. When deployed, serverless will
# print the url the aws api gateway assigned to execute this function.
functions:
  requestUploadURL:
    handler: handler.requestUploadURL
    events:
      - http:
          path: requestUploadURL
          method: post
          cors: true

resources:
  Resources:
    UploadBucket:
      Type: AWS::S3::Bucket
      Properties:
        BucketName: slsupload
        AccessControl: PublicRead
        CorsConfiguration:
          CorsRules:
          - AllowedMethods:
            - GET
            - PUT
            - POST
            - HEAD
            AllowedOrigins:
            - "*"
            AllowedHeaders:
            - "*"
// file: requestUploadURL.js

module.exports.requestUploadURL = (event, context, callback) => {
  var s3 = new AWS.S3();
  var params = JSON.parse(event.body);

  var s3Params = {
    Bucket: 'slsupload',
    Key:  params.name,
    ContentType: params.type,
    ACL: 'public-read',
  };

  var uploadURL = s3.getSignedUrl('putObject', s3Params);

  callback(null, {
    statusCode: 200,
    headers: {
      'Access-Control-Allow-Origin': 'https://www.my-site.com'
    },
    body: JSON.stringify({ uploadURL: uploadURL }),
  })
}
The interesting part is that we don't deal directly with the uploading or writing the file to s3: by using the getSignedUrl method, we ask s3 to provide a pre-signed URL that would respond to a PUT call and only work with a matching content type. This, along with the Access-Control-Allow-Origin header, gives us some level of security in avoiding random clients bombarding our Lambda with malicious requests, and it does also simplify our lives quite a bit.
Assuming we already had the file in the client, processed with a FileReader, the steps to upload it would look something like this
fetch(`${apiBaseURL}/requestUploadURL`, {
  method: "POST",
  headers: {
    'Content-Type': 'application/json'
  },
  body: JSON.stringify({
    name: file.name,
    type: file.type
  })
})
.then((response) => response.json())
.then(json => fetch(json.uploadURL, {
  method: "PUT",
  body: new Blob([reader.result], { type: file.type })
}))
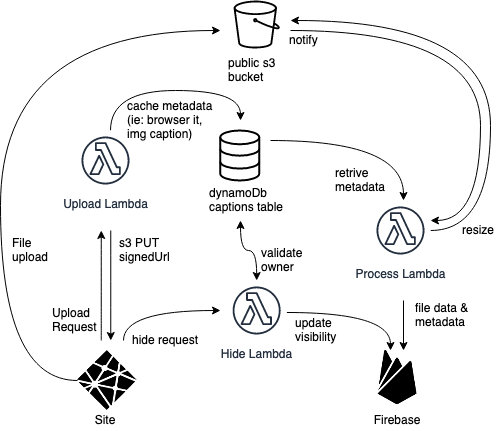
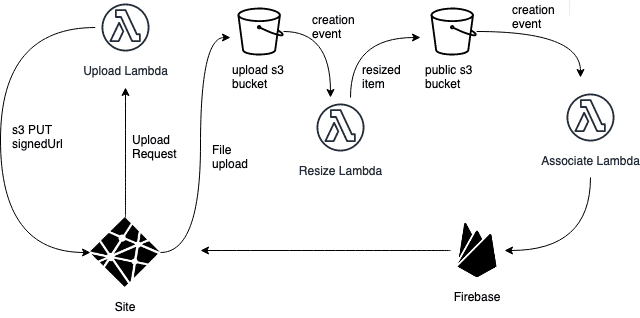
Once I got that working, I immediately though about complicating my life, by resizing the images. I knew what I wanted to do: on upload to the s3, I wanted to notify another Lambda that a file had been uploaded, in order to resize it.
In the serverless.yml the changes were pretty straight forward, I had only to add this chunk in the functions sections
process:
    handler: resize.handler
    events:
      - s3:
          # the DestinationBucket needs to be defined pretty much
          # as the UploadBucket I already had in the resources
          bucket: DestinationBucket
          event: s3:ObjectCreated:*
The resizing was a little more complex for a few reasons: first of all I discovered the hard way that AWS dropped offering out of the box support for ImageMagik. Node 8 is the last env in which that worked and it's being dropped in December.
Luckily, I built a career on my google skills and I managed to solve the problem with a one liner that would add GraphicsMagik support.
process:
    handler: resize.handler
    layers:
      - arn:aws:lambda:eu-west-1:175033217214:layer:graphicsmagick:2
    events:
      - s3:
          bucket: destinationBucket
          event: s3:ObjectCreated:*
A layer is pretty much what it sounds like: it's an additional set of libraries added on top of a vanilla Lambda env – from AWS docs: "With layers, you can use libraries in your function without needing to include them in your deployment package" – and there are several open source ones.
Then I introduced a new s3 bucket, where my Lambda would save my resized files. At that point, I was saving a thumbnail, a resized and the original file in this second, public s3, while I narrowed down the permissions of the initial s3.
The only step left was updating the firebase db with the appropriate data. Firebase data modelling is a bit of a pain if you want to do things right, but the flexibility given by the lack of a schema enables a lot of trial and error potential, so I decided to just go for it.
With the same notification mechanism, this time off the destination bucket, I had another Lambda updating Firebase
const admin = require('firebase-admin')
const { databaseURL } = require('./config.json')
const { parseEvent, fileToDbPath } = require('./helpers')
var serviceAccount = require('./serviceAccountKey.json')

// My database is readonly, in order to write I need to login
// with admin credentials on the server.
const initializeDb = () =>
  admin.initializeApp({
    credential: admin.credential.cert(serviceAccount),
    databaseURL,
  })

module.exports.handler = (event, context, callback) => {
  const { file } = parseEvent(event)

  const firebase = initializeDb()
  const db = firebase.database()

  const ref = db.ref(fileToDbPath(file))

  ref.set(
    {
      file,
      timestamp: Date.now(),
    },
    () => {
      // This is particularly important: not deleting the firebase
      // client instance would leave the Lambda hanging, forcing it
      // to timeout and retry several times.
      firebase.delete()
      callback(null, {
        statusCode: 200,
      })
    }
  )
}
as dumb as it looks, this is all it took to get to see stuff correctly in a simple create react app with Dropzone and React Firebase Hooks.
At this point I was still missing a key part, which was the caption: I didn't want user just to be able to upload a photo, I wanted them to be able to title it.
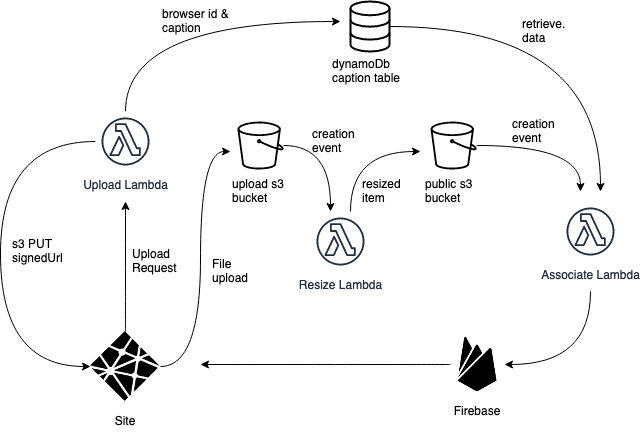
DynamoDB is a NoSql db with a flexible, potentially schemaless structure and it's often use for the purpose of caching values for situations such as mine.
In the resources section of my serverless.yml I added a DynamoDB table with an Id of type string (my file name, which I had turned to an uuid by then) and the lowest possible provisioned throuput - did I mention that I didn't want to spend much on this?
  DynamoDbTable:
    Type: AWS::DynamoDB::Table
      Properties:
        TableName: captions
        AttributeDefinitions:
          - AttributeName: Id
            AttributeType: S
        KeySchema:
          - AttributeName: Id
            KeyType: HASH
        ProvisionedThroughput:
          ReadCapacityUnits: 1
          WriteCapacityUnits: 1
and this little extra on the IAM role section, aka the level of access the lambdas would get to the resources:
  - Effect: Allow
      Action:
        - dynamodb:GetItem
        - dynamodb:PutItem
      Resource: arn:aws:dynamodb:*:*:table/captions
Saving and retrieving information to a DynamoDB table is not too bad and I ended up with the following helper
const AWS = require('aws-sdk')
const dynamodb = new AWS.DynamoDB.DocumentClient()

module.exports.writeCaption = ({
  id: Id,
  caption: Caption = '',
}) => dynamodb.put({
  Item: { Id, Caption },
  TableName: 'captions',
}).promise()

module.exports.readCaption = async Id => {
  const data = await dynamodb.get({
    Key: {
      Id,
    },
    TableName: 'captions',
  }).promise()

  return data && data.Item && data.Item.Caption || ''
}
This table ended up growing a bit, from the initial structure, but we'll get there.
The need for simplification
At this point I received an email from Amazon saying that I was at 75% of the free tier for the amount of operations against S3 for the current month. With a total of 2000 operations, I didn't think I would hit the ceiling so fast, but apparently when you write 4 files for each test file and you use a Error Driven Development approach, it doesn't take too long. I decided to avoid briging the original file over to the public bucket and to avoid having a small thumbnail, but just having a sensible "resize".
This didn't sort out the speed issues though, and at that point it struck me: I could use only 1 bucket, update the image asynchronously but in the meantime update Firebase anyway, to get the original image to the users as soon as possible.
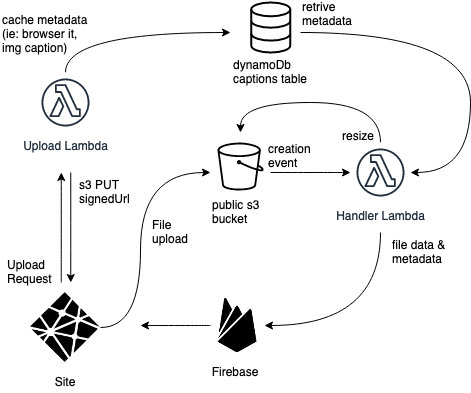
And so I did.
After a few experiments, the file structure was something on the lines of o/${parentId}/${imageId}.ext, where o would stand for original and r for resized, parentId would be the uuid of the image opening the thread and imageId would be the id of the image being processed – which could be the same as the parent id, when that was the one being uploaded.
After a little work in merging the resize and the associate Lambas and a fine tuning the abstraction, the new handler Lambda looked rather elegant
module.exports.handler = async event => {
  const file = getFileFromEvent(event)
  const [size, parent, id] = file.split(/[./]/g)

  await associate(file, parent, id)

  if (size === 'o') {
    await resize(file)
  }

  return null
}
I could've split the functionality in two separate Lambdas, but the s3 notification mechanism works only to one destination, and I would've had to introduce an SNS (Simple Notification Service) to trigger multiple Lambdas and to be completely honest I couldn't be bothered.
Anyway, the first time and image was uploaded via the signedURL it would land in the o folder, the new object would trigger this handler that would associate the image on the db – similar hierarchical structure: /${parentId}/${fileId} – with the data in the DynamoDB table, and then resize the image. The resized image creation would retrigger the Lambda again, but this time the data on the db would change only the file path and the timestamp.
Ugh.
I didn't want the timestamp to change. So I added it to the DynamoDB table along with the caption and read it from there instead of updating it at association time.
I was pretty happy with it, to the point I started working on "side hustles" like highlighting the images you uploaded by relying on a naive, yet efficient browser fingerprinting library and such, when my partner asked me about moderation.

I did a lot of trial and errors with this, but I had my goal pretty clear: I decided that the owner of a thread should receive some sort of encrypted signature, I could reasonably guarantee it wasn't forgeable, and with that they could hide any content in the thread.
Pseudo-signing a request
In order to do that I added a KMS key to my serverless, for encryption purposes.
Here's the part in the resources sections:
    KMSKey:
      Type: AWS::KMS::Key
      Properties:
        Enabled: true
        KeyPolicy:
          Statement:
            Effect: 'Allow'
            Principal:
              AWS: arn:aws:iam::#{AWS::AccountId}:root
            Action:
              - 'kms:*'
            Resource: '*'
and here's the IAM role bit:
    - Effect: Allow
      Action:
        - kms:Encrypt
        - kms:Decrypt
      Resource:
        Fn::GetAtt: [KMSKey, Arn]
Please pay attention to this #{AWS::AccountId}: this is not native in serverless and it does require a plugin, but I didn't want to hardcode anything in the yml file. Towards the end I refactored most of the file to remove even the resource names from it, so that they could be read from the same json consumed by the Lambdas, following the instructions.
The KMS encryption helper was another bit of a rabbit hole, but once I got it working, it looked pretty neat too
const AWS = require('aws-sdk')
const kmsClient = new AWS.KMS({ region: 'eu-west-1' })

module.exports.encrypt = async text => {
  const paramsEncrypt = {
    KeyId: process.env.KMSKeyId,
    Plaintext: `${text}`,
  }

  const encryptResult = await kmsClient.encrypt(paramsEncrypt).promise()
  return Buffer.from(encryptResult.CiphertextBlob).toString('base64')
}

module.exports.decrypt = async encoded => {
  // In the decrypt I don't need to pass the KeyId. As per the AWS docs:
  // If the ciphertext was encrypted under a symmetric CMK, you do not need
  // to specify the CMK or the encryption algorithm. AWS KMS can get this
  // information from metadata that it adds to the symmetric ciphertext blob.
  const paramsDecrypt = {
    CiphertextBlob: Buffer.from(encoded, 'base64'),
  }

  const decryptResult = await kmsClient.decrypt(paramsDecrypt).promise()
  return Buffer.from(decryptResult.Plaintext).toString()
}
The process.env.KMSKeyId is exported by the Serverless config, by adding this piece straight under the provider node:
  environment:
    KMSKeyId:
      Fn::GetAtt: [KMSKey, Arn]
I only needed to decide what to encrypt and return to the client, to sign the hide invocation.
The browserId I mentioned was a given, but I also decided to add the parent image id: during the upload of the first image in a thread, the owner of the thread would receive a code which is the encryption of their browser id and the uuid of the image just uploaded. Anyone uploading any other image to that thread wouldn't get any code, but the image would get associated with the thread owner code in the DynamoDB table, along with the other data.
Once the owner wanted to hide something, they would send browserId, id of the image they want to hide and their owner code and the logic to match up would look like this
  // readMeta is the name of the function that reads from
  // DynamoDB after all the additions
  const data = await readMeta(id)

  // first thing first: do the thread owner code match?
  if (ownerCode !== data.ownerCode) {
    return
  }

  // if it matches, I'm decrypting the owner code I received in the payload
  // and I'm splitting it in the 2 parts that composed the original string
  const parts = await decrypt(ownerCode)
  const [browserIdFromCode, parentId] = parts.split('/')

  // if the browserId in the payload is different from the one
  // in the owner code, there's something fishy going on
  if (browserIdFromCode === userBrowserId) {
    // if everything matches, I use the parentId in the
    // thread owner code to disable the image
    await set(`/${parentId}/${id}/disabled`, true)
  }
I have to say that if anyone proves willing and capable to break this mechanism, they deserve to takeover my app, kudos.

Wrapping up
With all the core features nailed down, I started iterating a bit on the front end, which I neglected for far too long. The site is in itself is pretty basic – I used newcss with very little bespoke css on top – but the code at least is decent now and I ended up adding a carousel view and other few bits and bobs to make the experience better. In the meantime I had already got a better uploader, integrating some basic editing tools (cropping, rotating, brighness and contrast control, to name a few).
My partner is probably testing it out tomorrow and I'm here at 2.30am writing this, hopefully it won't collapse (also: I'm probably publishing this tonight, but I will double check the grammar, typos etc tomorrow, so please be kind)
One last note about Serverless: Serverless is really powerful and there are probably thousands of ways to achieve the same results, but only a few combinations work. well together. I had countless situations where resources creation was stuck due to the way I combined initialising some resource, and only exposure can help with that. The debugging process wasn't too bad though. The other aspect is that Serverless supports different stages (I normally call them environments, but that's the same thing) and the default, without specifying, is dev. If you miss this, and start calling things without any specific identification, it might get tricky: Lambda gets the stage in the name, when created, but other resources (like the s3 buckets or the DynamoDB tables) don't, and it can be annoying to rename a thing in the aftermath.
The code
ImgThreads: https://github.com/cedmax/imgthreads